Saturday, April 2, 2011

Sugarwork

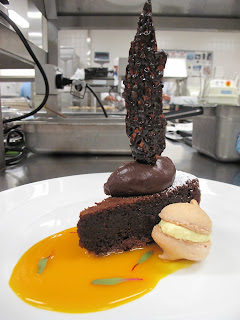
Chef Luigi's Deep Sea Sugarwork

This is a particularly hard post for me to do, being the final write up of my LCB experience, which only partially exonerates my procrastination in uploading this more than 3 6 9 10 months after the fact. It was a bittersweet lesson, making sweet sugarwork on our last day of school. But it must be done and proceed we shall.

Blown Sugar Swan & Satiny Rose

Behold the above objectives of the day: impressive and intimidating-looking swans and roses. Fingers crossed I will be producing more than just burnt fingers by the end of class.

Raw Isomalt

All sugar sculptures begin life as Isomalt, a naturally occurring sugar alcohol derived from beets (nasty stuff if you ask me), often used by diabetics for their low calorie count and minimal impact on the blood sugar level. Calorific concerns aside (don't even get me started on the after effects such as flatulence and diarrheah), it is isomalt's unique malleable property which makes it more suitable for sugar work than pure sugar per se.

Boiling Colored Isomalt To 170°C - 180°C
Arresting In Ice Water To Halt Cooking Process

To get isomalt into working condition it is first melted down over very high heat, a process during which one's color of choice may be added for the desired result. The first showpiece being that of aquatic life, seaweed green and oceanic blue are applied.

"Corals" Cast In Alcohol
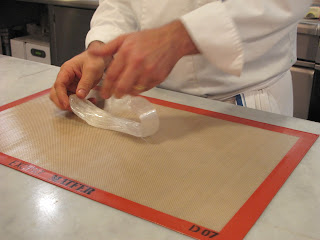
"Bubbles" Cast On Crumpled Greaseproof Paper

"Casting" isomalt simply means pouring it into a beaker of alcohol or onto greaseproof paper to set. In contact with the former, a chemical reaction results in gas bubbles erupting in the setting isomalt, and a coral effect is thus achieved. On the latter, a flat sheet emerges which can then be used as a base, backdrop or indeed any part of a showpiece as you see fit.

Smooth & Motif-ed

Isomalt Cast In Raw Isomalt

Melting & Fusing Isomalt Pieces Together

The ends of each piece are dipped into a pot of still hot-as-hell molten isomalt to melt before being fused together.

With the deep sea set complete, Chef Luigi proceeds to create a fish out of blown sugar, a common sugar work process also employed in the making of our beautiful swan.

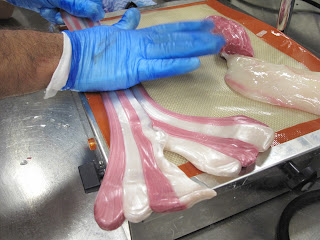
Pulling (Hot!) Isomalt For Aeration, Elasticity & Sheen

Once the isomalt has been brought to temper and cast, the pulling process begins. This must be done while the isomalt is still hellishly hot and pliable, pulled and pulled again over and into itself, trapping precious air bubbles in the process. It is this progressive build up of tiny air bubbles which gives the worked isomalt its opaque, glossy sheen and improved elasticity, a prized quality in the sugar-blowing process.

Heating Sugar Pump For An Airtight Adherence To Isomalt
Pulling The End To Form The Swan's Head & Neck

A special pump is heated and fused airtight to one end of the pulled isomalt, to ensure when pumped, no air escapes and an even expansion occurs within. Next, one end of the isomalt is carefully pulled and stretched to form the neck of the swan.

Then the blowing commences. This is a controlled process, much as size and ego go, as blowing the body up too much will eventually crack the isomalt and the process will have to be repeated again.

Pumping (& Plumping) Up The Body
Cooling Down To Set

"Feathers" Made By Casting Pulled Isomalt In Leaf Molds
Fusing On Wing & Tail "Feathers"

Let's see the entire process in slow motion, shall we?

Chef Karen Pulling Isomalt 
With Her Pair Of Handy Dandy Dish Washing Gloves!

The "La Mien" Technique For Better Aeration & Sheen

Spray Painting Blown Isomalt Fish
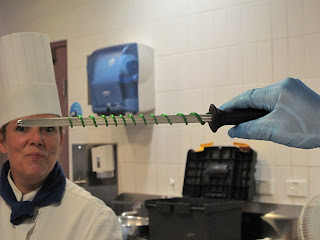
Pulled Isomalt Coils

Once the pulled and blown isomalt has been worked into shape and enhanced with features such as feathers and tails, the finishing touches are added; in the case of our aquatic friend, it is spray painted with various colors to finally bring it to life.

Isomalt can also be worked and shaped like normal sugar, molded into leaves or twisted around a knife sharpener into coils. The possibilities are endless.

Pondering About The Wonders Of Isomalt

3 Chefs A Merry Party Makes

One More Groupie Pic

Break times are dearly cherished: the precious minutes between demo and kitchen are usually spent catching up on gossip or some last minute z's, or grabbing a bite and a quick hit of java before entering the kitchen, where theory becomes practical.

My Swan! Can't Believe I Pulled It Off

This being the last class, I decided I could either go big or go home. So rather than attempt the "easier" satin rose, I opted for the more challenging swan, and set about blowing and pulling the sugar, half convinced I wouldn't be able to pull it off - "pull" it off, get it? Bada-boom.

Hey presto, not only did I not fail miserably, I actually managed to produce a rather respectable looking bird. Not bad for a sugar novice, eh? :)

Complete With A Butt Hole :p

Chef Luigi's Kitchen Extra: Sweet, Shiny Ribbon

Pulling & Fusing Together Colored Isomalt

More Pulling For A Beautiful Sheen

Snipping Off Loops, Piling Them On

Building The Ribbon, Loop By Shiny Loop

Have You Ever Seen A Prettier Off Cut?

Sweet Centerpiece

One Last Pizza Party

Story Of My Life

Friday, April 1, 2011

Flourless Chocolate Cake, Cocoa Crumble (Gluten Free), Water Based Milk Chocolate Mousse, Coulis De Mangue, Cocoa Nib Tuille, Ricotta A L'Orange, Maracon Batons

Chef's Plated Flourless Chocolate Cake...

 ...& Ricotta A L'Orange

Today we take on gluten-free baking, to cater to the gluten-intolerant unable to enjoy cakes and other desserts often made with gluten-laden wheat flour. 

Because everyone deserves to eat dessert, we made not 1 but 2 gluten-free treats today: the darkly sensational flourless chocolate cake (sometimes known as the French chocolate torte) and on the other end of the color spectrum a bright, sunshine orange ricotta strudel. 

A similar take on the former is the self saucing chocolate pudding made in Intermediate Patisserie, you will see why in a while. Today's tasty treats will also be accompanied by a variety of garnishes. There's a lot going on folks, so let's get cracking!

2 Heads Are Better Than 1

While Chef Gert whisks together melted dark chocolate, butter, brown sugar and egg yolks, Ronaldo whips egg whites with caster sugar till soft peak. Almond meal goes into the chocolate mix before carefully folding in the whipped whites.

Cake Mix: Raw & Risen

The cake is baked in a lined cake tin at a moderate 160°C. This cooks the eggs in the mix slowly, allowing the protein strands sufficient time to strengthen and provide slight structure to the cake. The cake will double in volume when baked, but don't get your hopes up, pun intended, as it will sink with a crackled surface when cooled.

Sunken & Sliced

This shrinkage is due to the absence of flour to provide strong structural support to the cake, which ain't such a bad thing, as the result is a dense and slightly gooey center, which in the dessert world translates to Yummalicious! In addition, the absence of flour makes it safe to under bake the mix for another well-loved dessert, the molten chocolate cake.

Macaron Rounds & Batons (Gluten Free, As Usual)

A Sure Footing

Whisking Orange Ricotta Filling, Lubing Up Filo Sheets With Butter

I never used to like ricotta. Blame it on the low-fat version which was the only one available at my local market: tart and curdled, not very appetizing at all. This tub of full fat goodness, however, was amazingly creamy and full flavored, perfect filling for its crisp filo shell.

Load & Lock

The filling is a straightforward party of ricotta cheese, sugar and orange zest whisked together until thoroughly combined. Filo sheets are treated the same way as in our baklava, lusciously lubed with melted butter and stacked 4-sheets high.

Roll Up & Tuck In The Ends To Keep The Good Stuff In!

Load the creamy goodness into the buttered filo stack, exercising restraint when doing so, least the filling leaks out of the delicate filo sheets. Like a deft sushi chef, fold one end over the filling, tucking in the ends to pack it all it, before rolling as you would sushi, spring rolls or cigars, anything rollable, really.

Glossed Up & Baked

Raw Sand aka Cocoa Crumble

Ah, the magic of modern gastronomy demystified. Increasingly popular in recent years, both in savory and sweet cuisine, edible "sand" is really a combo of butter, sugar, hazelnut meal and cocoa powder rubbed together until crumble-like before being baked to dry.

Baked Cocoa Crumble

A simpler method was employed in the hazelnut soil, which called for just 2 ingredients, malto dextrin and praline paste. While no baking is needed, malto dextrin isn't easy to acquire so you're probably better off making the cocoa crumble if attempting this at home.

Melting Chocolate & Water; Blending Chocolate Mousse

The first time I saw chocolate mousse made this way was on Heston Blumenthal's In Search Of Perfection and I thought it was an incredibly clever trick to know. That and his thrice-fried fries left me in awe of the man ever since. But I digress.

Lick The Bowl, Not The Blender!

Melt chocolate and water over a bain marie until the awful looking mess comes together, then barmix aka blend it over some ice water until very thoroughly and happily combined and you have yourself the purest, richest, most chocolatey mousse known to man; no cream, butter or sugar needed. Perfection indeed.

Sinister Looking Tar

Another increasingly popular garnish, this brittle black tile is made by stirring butter, cocoa powder, sugar, glucose, milk, vanilla and salt over heat until melted and thoroughly combined (never can one tell the myriad of ingredients that goes into a black mess). Spread the witch's brew on greaseproof paper as you would tar on a newly laid road.

Sprinkling On Cocoa Nibs

Cocoa nibs are small pieces of cocoa beans; crushed and roasted, they carry the same flavor compounds as chocolate. The nibs are sprinkled generously onto the black tar before baking. The resulting tuile carries an interesting flavor and texture which adds crunch and a slight bitterness to the rich and dense chocolate cake, or indeed any dessert as you see fit. Broken into small pieces and sprinkled onto ice cream? Divine. 

Boiling Mango Coulis, Bringing It All Together

Mango coulis is made by boiling mango puree, sugar and water with some lime juice to cut the sweetness and bring the coulis to life. Not much skill needed there, but then again, we are here to learn all aspects of pastry now, aren't we?

The coulis, together with the crumble, mousse, tuile and macarons, are used to plate our  chocolate cakes and orange ricotta strudels with a modern touch.

My Chocolate Plate

I probably should have omitted the macaron as I like my plated desserts simple and to my best ability, classy. Adding height to the plate, the tuile was also quite Moorish and not as bitter as I expected it to be. The mousse was goo-ooo-ood, together with the coulis lightening up the moist and outstandingly rich chocolate cake.

Chocolate on chocolate on chocolate, you can never have too much of a good thing. ;)

Plated Orange Ricotta Strudel

My last chance plating up desserts, which I enjoy doing when we're not busy baking and producing a product. The strudel was so good, with its cheese filling rich, sweet and slightly tart, the filo shell light and crispy, I could eat a dozen slices of these easy. :)

A Little Extra For Later ;)

Can You Spot The (Sweet) Difference? :)

2nd last chance for us to take as many pics as we can, how could we resist? Tomorrow's the last day of school, and I'm not looking forward to it one bit. :(